Basic Website: Sliders and Input Boxes

I’m still away form my Pi, but I was still working on my basic website. I wanted the sliders and the input boxes to be in accordance, so that there would be no code clashes in the future. To pull this off, I added this to my slider code:


<input id="ledRslider" name='ledRslider' type='range' min="0" max="255" step="5" class="ledSlider" oninput="ledSlider(this.value, 'R')">
<input id="ledGslider" name='ledGslider' type='range' min="0" max="255" step="5" class="ledSlider" oninput="ledSlider(this.value, 'G')">
<input id="ledBslider" name='ledBslider' type='range' min="0" max="255" step="5" class="ledSlider" oninput="ledSlider(this.value, 'B')">

The main thing to pay attention to is the


oninput="ledSlider(this.value, 'R')"

This bit of code sends the current value of the slider as well as the color of the slider to a Javascript function. The value part is obvious, but I also made the sliders send their color so that there could only be one function, opposed to three.

The corresponding JS function looks like so:


function ledSlider(val, color) {
    document.getElementById('led' + color + 'value').value = val;
}

As seen in the code above, the input box gets updated as the slider changes, and all of the input boxes will get changed to their corresponding slider, all with just one function.

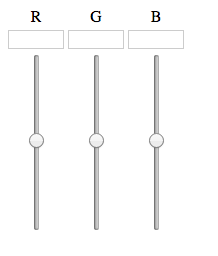
So far, the end result looks like so:

Slider Gif

Now, I have to make a XMLHTTPRequest from the JS to the corresponding PHP, which will then execute the a command from the Pi, which will finally change how the lights work.

The party has just begun.

Concept Behind PiVPN

As I am getting started on the PiRoom project, I realized that I will need to work on the Pi, and there will be chances that I won’t have the Pi on me. For that, I’m using an older Pi to act as my VPN server.

I will be using the openvpn software, because of it’s popularity, mostly because it is free. Once I have this system setup on my pi, I will most likely have a link for my phone, tablet, computer, PiRoom pi, and maybe a NAS or an external harddrive connected to the Pi. The advantages of this system is all my of electronics will be safe within my own home, and I can travel light.

Another, and maybe the main advantage is that I will be assigning a static IP address to my PiRoom Pi. With this, I would run into a lot of trouble if I wanted to say, use the pi in a coffeeshop, where there is a high chance of a conflict with the dhcp server.

I haven’t delved into the system yet (I’m currently not in my house, so I don’t have access to either of my Pis), but I’m assuming that I will either be able to

  1. Access my PiRoom on my home network because I will be using my PiVPN’s wireless. In this system, the PiRoom’s IP address will stay static, so I only have to deal with one.
  2. Connect both my device as well as my PiRoom to a network made by the PiVPN, and access the PiRoom through that network. Ideally, the IP address for the PiRoom would stay constant for both, but even if there are two IP addresses, that really isn’t that much of a problem.

Nevertheless, I’m going to try to get the first system up and running, that way, I won’t accidentally forget to attach my PiRoom to my PiVPN, and be stuck with no access to my Pi.

Basic Website: The Framework

I currently don’t have access to my Pi, so I thought it would be better to make the website in the meanwhile. I want the led control board to kind of look like a throttle setup, where the user can change the RGB values with a scrubber as well as type in values as well. With only a couple of minutes, I came up with this code,

<div id="roomColorControl">
 <table>
   <tr>
     <td><center>R</center></td>
     <td><center>G</center></td>
     <td><center>B</center></td>
   </tr>
   <tr>
     <td><input id="ledRvalue" name="ledRvalue" class="ledValue" type="number" max="255" min="0"></td>
     <td><input id="ledGvalue" name="ledGvalue" class="ledValue" type="number" max="255" min="0"></td>
     <td><input id="ledBvalue" name="ledBvalue" class="ledValue" type="number" max="255" min="0"></td>
   </tr>
   <tr>
     <td><center><input id="ledRslider" name='ledRslider' type='range' min="0" max="255" step="5" class="ledSlider"></center></td>
     <td><center><input id="ledGslider" name='ledGslider' type='range' min="0" max="255" step="5" class="ledSlider"></center></td>
     <td><center><input id="ledBslider" name='ledBslider' type='range' min="0" max="255" step="5" class="ledSlider"></center></td>
   </tr>
 <table>
</div>

The reason why I went with a table format is that it will be easier to handle, and it gives me the ability to put the text box on top of the slider without much hassle in the CSS area.

Speaking of CSS, the slider’s default position is horizontal, and I had to make it vertical, so I added this into my CSS file:


.ledSlider {
    -webkit-appearance: slider-vertical;
    writing-mode: bt-lr;
    width: 8px;
    height: 175px;
    padding: 0 5px;
}

With a little CSS here and there, the result is this:

LED strip control basic

Now, with a little Javascript and PHP magic, hopefully this can be used to control the lights!

Smart Room Concept

I have been reading a lot of articles online, and I realized if I could combine all of them, I could really beef up the quality of my room.

So far, I have a couple of features that I would like to implement in this system:

  1. Natural Wake-Up Clock
  2. Mirror HUD
  3. Web Interface

A while back, I stumbled across a clock that would change the brightness of a room in order to simulate the rising sun (example). However, at $100, I couldn’t justify the cost. I decided that if I made one myself, I would be able to make it for cheaper, as well as make it more expandable.

I’m going to use a Raspberry Pi for this build, due to its very light resource requirements, and its versatility (plus, I won one from a hackathon, and I didn’t know what to do with it).

Instead of a little bulb, I’m going to replace the whole room lighting with an LED strip, which will be controlled by the Pi, which should be able to change the color and the brightness of the strip. Theoretically, I should be able to simulate the rising sun with this setup. Another added benefit is due to the LED strips having to be RGB (in order for me to control them), they will emit a blue light, which as recent studies have shown, will affect the levels of melatonin in my blood, and will help me wake up.

However, I’m aware of the irony of last statement. If I’m using blue LEDs to wake up, won’t it make sleeping a pain? I will also be implementing a f.lux like system to the lights, so that it will be a bit easier to sleep.

To manage all of this, I will have a web interface which would be able to control the Pi remotely from a phone. This gives me the benefit of closing the lights without having to get up from bed (something that happens too much), as well as basically controlling the whole room from my fingertips.

I also saw another post about a “magic mirror”, essentially a HUD on a mirror. If I can get the materials, I believe this could be a valuable addition to my project, as I could see stats about the other processes running, as well as auxiliary information such as weather, time, etc.

These are some ideas which I would love to do, but I don’t know if I will be able to get to it:

  • Have the whole room voice controlled – that’s a whole other level of coolness
    • Have a natural AI for the voice control (like JARVIS) – that a whole other other level of awesomeness
  • Try to incorporate a leap motion like system on the mirror to have a responsive mirror
  • Have a music system setup so I can flash the lights to the whole room to the beat

Laser Cut Chess Set [June 2015]

This project is already completed, but I didn’t have this website running at the time, so this is just a transfer of my notes and files with this project.

My advisor when I was in 10th grade was retiring, and the advisory group decided to make him a chess set, as that was his favorite board game.

We split up the group into who would do what: I got the role of making the individual chess pieces. I decided that I would go with checkers style flat pieces, one side would be blank for checkers, the other would have the corresponding chess piece on it.


I thought this design was good for two reasons:

  1. The board can now support two different games
  2. I get to play with the brand-spanking new laser cutter.

For the majority of the pieces, I just downloaded the files from Google Images and called it a day. However, since my school, Pingree, has the logo of a pegasus, I thought that would fit nicely as the knight of the set. I imported all of these images into inkscape, and drew a red circle on top of each of the pieces, as shown below:

Laser Cut Pieces


I kept the circles a different color so I could apply a different power and speed setting in the laser cutter software: this allows the laser cutter to both engrave and cut the pieces.

Next, we took the different types of wood and ran some engraving patterns on them to see which combination of laser translational speed and power would be ideal for each type of wood:

Laser Pattern - Dark  Laser Pattern - Light

Afterwards, we quickly cut out the pieces, gave them to our resident wood expert, and the rest they say, is history:

PDeco1 PDeco4 PDeco3 PDeco2